

20R2 Functionality Guide
The Functionality guide is intended for Sales Operations, Business Administrators, System Integrators, and others responsible for making decisions about what features are needed for end users to be successful, and which features work together with existing customer configurations.
Information includes an over of each feature, examples, screen shots, and targeted information on how to use each feature. Select the heading link to display the topic which includes configuration instructions, if applicable.
Approved Email
Reviewing Approved Emails Before Sending
- iPad | Online | Windows
Approved Emails can be marked as requiring additional review before being sent to recipients by adding the {{requiresReview}} token to the appropriate content. This provides an additional level of compliance checking by enabling the final contents of an email to be reviewed and approved before it is sent to recipients.
Additionally, this feature can be used in other forms of Approved Email, for example, Approved Email receipts for signature transactions, to hold sent emails until certain business conditions are met.
For example, Sarah Jones composes an Approved Email containing content designated as needing additional approval. When she sends the email to Dr. Ackerman, it is first reviewed by a compliance user, who views the entire rendered contents of the sent email. The compliance user notices non-compliant language present and rejects the email, providing a reason for his rejection. Sarah Jones is notified about the rejection and is able to view the reason provided by the compliance user. She composes another email to Dr. Ackerman addressing the reason for rejection and resends the email. The compliance user approves the email and it sends to Dr. Ackerman.
In another example, Sarah Jones visits Dr. Ackerman, who places an order for Cholecap. Her org has Approved Email receipts for signature transactions enabled, so she also sends an Approved Email serving as Dr. Ackerman’s receipt for the order. Sarah’s company requires receipts not be sent until confirmation of the order’s fulfillment by the vendor, so the receipt does not immediately get sent to Dr. Ackerman. Once the order is fulfilled, an external process updates the receipt’s status, sending it to Dr. Ackerman.
Consideration
- Customers are responsible for creating a process to view, approve, and reject these emails
- This feature can be used in conjunction with the Previewing Rendered Approved Email Content feature to view the rendered Approved Email exactly as it would display to participants, aiding in the approval process
- Once an email is approved or rejected, its status cannot be edited again
Sending an Approved Email Marked for Review
When an end user selects Send for an Approved Email including the {{requiresReview}} token, the email does not immediately send to recipients. Instead, the following process occurs automatically:
- The Sent Email’s status is set to Pending, indicating the email must be approved by an enabled reviewer.
- The following Sent_Email_vod fields stamp with the following information:
- Email_Content_vod and Email_Content2_vod fields – Stamp with the final HTML content of the email
- Subject_vod – Stamps with the subject of the sent email
-
User_Input_Text_vod – Stamps with any free text or rich text entered by the end user using the following format:
[{“TOKEN NAME”: “User Input Text},{“TOKEN NAME”: “User Input Text”}]
For example, [{"customText": "Example"},{"customRichText": "<b>Bold Example</b>"}]
- The Sent Email’s status updates to Pending Approval.
Sent Emails with a status of Pending Approval can be reviewed by users via a customer-defined proces s and can be either accepted or rejected by updating the Status_vod field to either Approved_vod or Rejected_vod.
If the end user does not schedule the email and sends it immediately, the email must be approved by the reviewer within 14 days or else the email will not send even if approved.
When an email is approved or rejected, the following information stamps on the Sent Email:
- Review_Datetime_vod – The datetime of the approval or rejection of the email
- Reviewer_vod – References the CRM user who approved or rejected the email
If the reviewer approves the email, the email is sent to the recipient when the email is next processed by the integration.
If the reviewer rejects the email, they may enter a reason for doing so in the Rejected_Reason_vod field. Rejected emails are not processed and do not send to recipients. End users are notified of rejected emails via a Multichannel Alert.
End users can view approved emails on the account’s timeline.
Viewing Alerts for Rejected Approved Emails
When a Sent Email is rejected, the Approved Email end user who sent the email is notified of the rejection via an urgent-level Multichannel Alert. This informs end users the email was not sent and also provides an opportunity to learn why the email was rejected to prevent future rejections.
This alert displays the following information to the end user:
- The reviewed datetime as defined in the record’s Reviewed_Datetime_vod field
- The name of the Approved Email template used
- The reason for the rejection as defined in the record’s Rejected_Reason_vod field
CLM
CLM Retry Sync
- Online
If there are errors when syncing CLM content from Vault to CRM, the errors are logged and any presentations impacted by those errors are skipped. The sync successfully processes the remaining presentations. This improves the efficiency of each sync and prevents errors from failing the entire sync. After fixing the errors, admins can retry syncing the failed presentations using the Retry Failed button in the CLM Admin Console.
For example, Alice Adams has two CLM presentations in Vault — one about Cholecap and one about Restolar. Restolar exists as a product in CRM but Cholecap does not. She syncs both presentations to CRM via the CLM Admin Console. The Restolar presentation syncs successfully, but because Cholecap does not exist as a product in CRM, the Cholecap presentation fails to sync. Alice fixes the error based on the details from the sync notification email and selects the Retry Failed button in the CLM Admin Console to retry syncing the failed Cholecap presentation.
Configuration is not required for this feature.
Retrying Sync Failures
Admins can view a detailed CLM sync history for all syncs in the past seven days in the CLM Subscription History of the CLM Admin Console. Additionally, the sync notification email includes CSV attachments containing information about the successes, failures, and pending retries from the most recent scheduled sync.
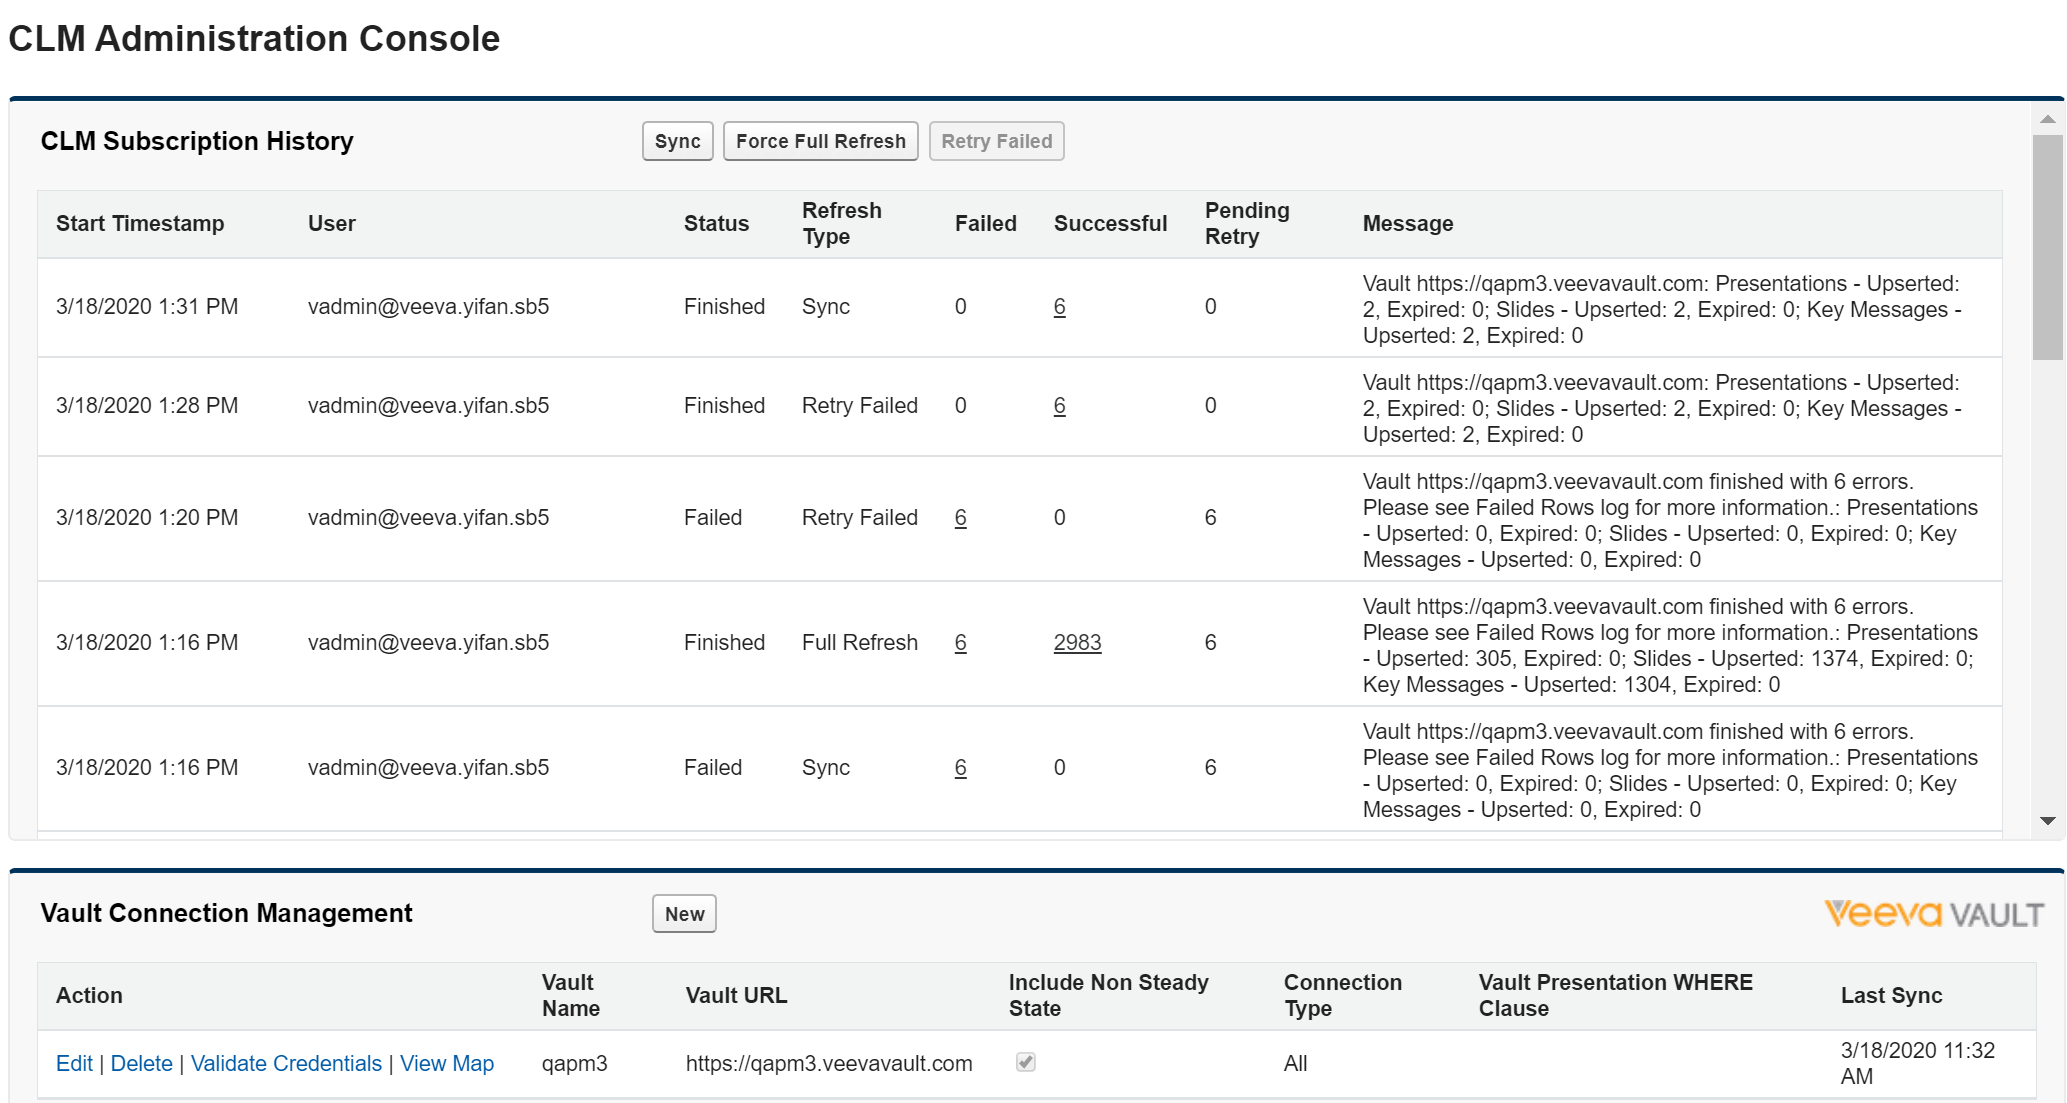
A sync error for a slide prevents all presentations using that slide from syncing. Once errors are fixed, admins can do any of the following:
- Select the Retry Failed button on the CLM Admin Console to sync only corrected presentations. This retries entire presentations containing errors that have been fixed.
- Select the Sync button in the CLM Admin Console to perform an incremental sync to sync all content, including corrected presentations
- Wait for the next scheduled sync to sync all content, including corrected presentations
Scheduled and incremental syncs do not retry previously failed presentations until the errors are fixed. A full refresh retries all content, including failures. See Syncing Content from Vault for more information.
The Retry Failed button does not display if all items sync successfully.
Consent Capture
Capturing Consent Using Confirmation Emails
- iPad | Online | Windows
After capturing consent with a confirmation email for an account, an Opt-In Pending consent record is created. However, the account’s current consent status is based on the last confirmed consent record. The account’s confirmed consent record is the unexpired opt-in or opt-out record.
The following table displays how consent and Approved Email behave when there is an Opt-In Pending consent record:
|
Default Consent Type |
Confirmed Consent Record |
Consent Capture Screen |
Approved Email Screen |
|---|---|---|---|
|
Implicit |
Opt In |
Displays as opted in. |
Users can send emails. |
|
Implicit |
Opt Out |
Displays opt-in pending. |
Users cannot send emails. An error displays when composing an Approved Email. Recipients must first confirm consent via the confirmation email. |
|
Implicit |
Does not exist yet |
Displays as opted in. |
Users can send emails. |
|
Explicit |
Opt In |
Displays as opted in. |
Users can send emails. |
|
Explicit |
Opt Out |
Displays opt-in pending. |
Users cannot send emails. An error displays when composing an Approved Email. Recipients must first confirm consent via the confirmation email. |
|
Explicit |
Does not exist yet |
Displays opt-in pending. |
Users cannot send emails. An error displays when composing an Approved Email. Recipients must first confirm consent via the confirmation email. |
Engage
Rating an Engage Experience
- iPad | Online
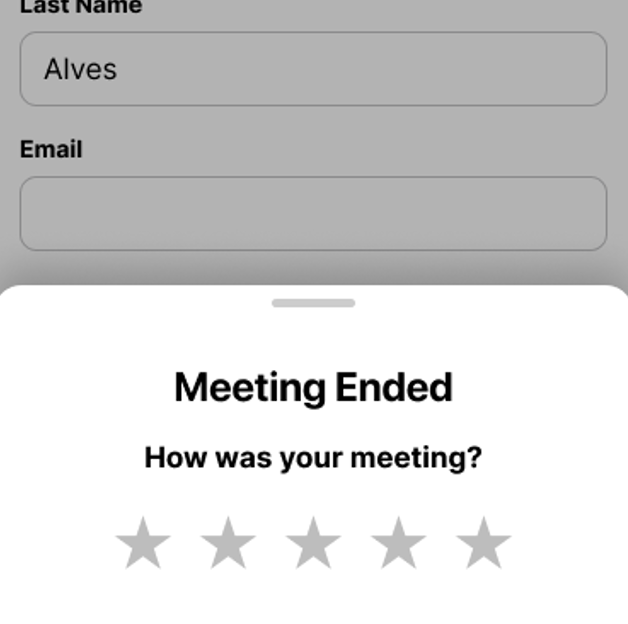
Engage attendees can now rate their meeting experience. Collecting post-meeting information from meeting attendees is a common practice granting customers insights into the quality of the remote experience, and how those interactions can be improved in the future. Receiving this information as soon as possible increases response rates, accuracy, and the amount of details provided.
Immediately after a meeting or a webinar, attendees are able to rate a meeting based on a number of stars. The default star rating is zero stars. Each star rating displays a description to indicate the meaning of that rating.
|
Stars |
Displayed Description |
|---|---|
|
0 |
(no description displays) |
|
1 |
Unusable, could not meet |
|
2 |
Poor, had many issues |
|
3 |
OK, had some issues |
|
4 |
Good, had an issue |
|
5 |
Awesome meeting |
The ratings and feedback sections are localized in all Veeva supported languages.
For example, Dr. Mary Benson attends an Engage meeting with Sarah Jones. Immediately after the meeting finishes, a star rating modal displays to Dr. Benson. She selects a four-star rating and then answers three questions about the meeting. Dr. Benson submits her responses and leaves the meeting.
Attendees must upgrade their apps to at least version 202.0 (20R2) to enable this feature.
Using the Engage Experience Rating
Once a meeting ends, attendees are presented with the overall star rating. For the Web Client and Windows app, the Next button becomes enabled after selecting a star rating. Selecting Next displays the feedback options. For iOS and Android HCP apps, the tray expands to display the feedback options after selecting a star rating.
The wording of the feedback section depends on the selected star rating:
- 1-2 stars – Oh no. What was the problem?
- 3-4 stars – Got it. What can be improved?
- 5 stars – Great. What stood out?
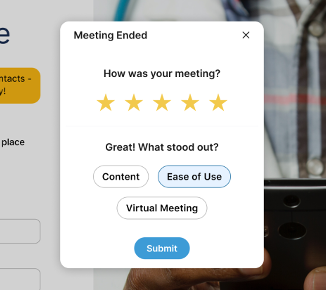
After selecting a star rating, attendees can select from the following options to provide additional feedback for analysis:
- Joining
- Audio
- Video
- Content
- Screen Share
- Other
When five stars is selected:
- Content
- Ease of Use
- Virtual Meeting
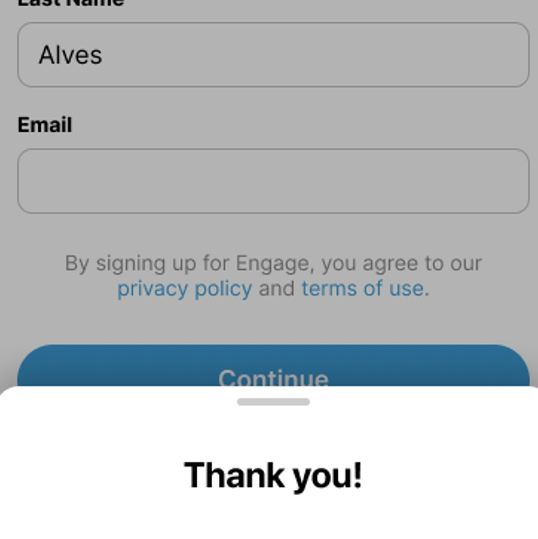
After a selection is made, attendees can select the Submit button. This button only displays after a star rating selection is made. After selecting Submit, a thank you message displays.
Attendees are not required to submit a star rating or any additional feedback. The feedback can be skipped by swiping down on iOS and Android devices and by selecting the X button on the star rating screen for Web and Windows platforms/devices.
Events Management
Selecting Attendees in Hierarchies
Event owners on Windows Tablet can now drill down into account hierarchies when adding attendees to their event.
Bulk-Adding Event Attendees
Events Management users on Windows Tablet can add event attendees in bulk, allowing efficient input of information.
